With all of the popularity of OpenStack in general, and specifically with my other posts on deploying the Rackspace Private Cloud lab on VMware Workstation, I think it’s time for me to update with a new lab build for everyone.
This lab build process will be done using VMware Workstation, an Ubuntu 12.04 LTS ISO file, and a few install shell scripts that I’ve created for you to pull from Github.
NOTE: This looks like a lot of work because it’s a long post, but the actual steps are quick and I’ve tried to do the heavy lifting with the install scripts, so hopefully this will only take about 20-30 minutes for you to be fully up and running.
This post will run through the use of 3 scripts that are used to set up:
- OpenStack pre-requisites – MySQL, RabbitMQ, NTP, Ubuntu Cloud Keyring, and other useful services like OpenSSH server for remote access into your VM
- OpenStack Identity (Keystone)
- OpenStack Image Service (Glance)
- OpenStack Compute (Nova)
- OpenStack Dashboard (Horizon)
There will be more posts coming after this to add additional features to illustrate the entire set of OpenStack Havana core projects, but this is your starting point to get you up on your first OpenStack Havana lab.
What is different with this install?
In my previous posts, I showed you how to use the Rackspace Private Cloud deployment as a simple recipe-oriented build that was self-installing with some input. Those builds were based on the Folsom release. This time around, I wanted to show you how to run a simple shell script with minimal input, and use the native build of OpenStack Havana so that you can test the waters on a more self-directed deployment.
The use of a shell script will give newcomers a little bit of insight in how to deploy using the command structure without using Puppet or Chef. Now, why would we do this when a more efficient way is available using those tools, right? It’s all about the learning process.
I want to bring more folks to the first steps of OpenStack deployment and management so that we can all grow our comfort with the process. Don’t worry, there will be lots of fully orchestrated posts coming, but we have to walk before we run.
Creating your Virtual Networks
This VM will require 2 networks: a public network that has internet access to pull down the installation components, and a private network that is where we launch our nested virtual guests into.
In VMware Workstation, go to your Virtual Network Editor:

Once the editor launches, you will see a variety of different networks. Your internal network will different, but I’ve built the process around a private network of 10.10.100.0/24 which in my case is VMNet13. Be sure to uncheck the Use local DHCP service to distribute IP address to VMs and be sure that your Subnet IP matches the image below:
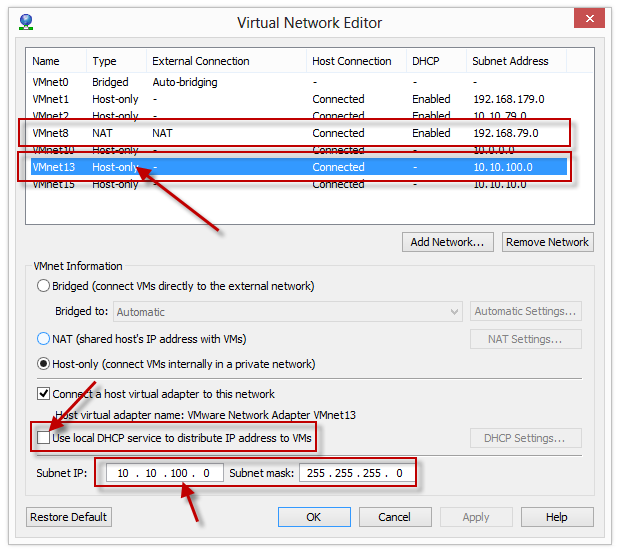
You will need to know your IP range of the NAT network, so please write down an IP address that is on your NAT range. In the case of mine, I’ve used 192.168.79.50/24. That will be used as we launch our script once the VM is built.
Download your Ubuntu 12.04 LTS ISO file
To download your Ubuntu install image, go to http://www.ubuntu.com/download/server and choose the 12.04.03 LTS 64-bit, and keep track of where you store the ISO file once it is downloaded.
Once you have your ISO file, and your VM network information, we are ready to get started.
Building your All-in-One VM with VMware Workstation
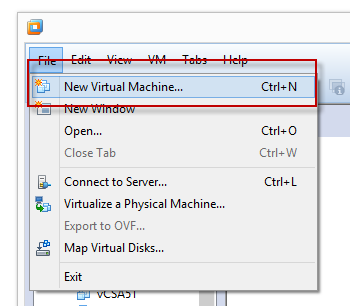
This is a step-by-step of the process to deploy a new Ubuntu Server VM guest on VMware Workstation 10 using the Easy Install wizard. You may already be quite familiar with the process, but be sure to double-check your steps as there are some key points which could impact the build later.
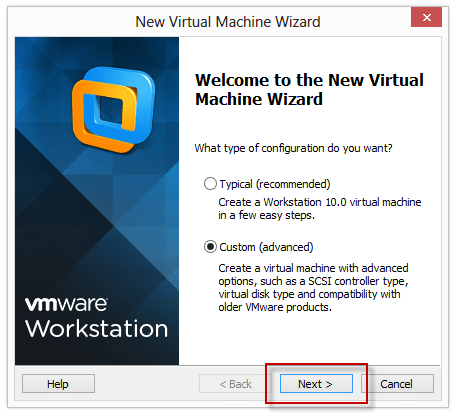
This will launch the New Virtual Machine Wizard. Choose Custom (advanced) and click Next:
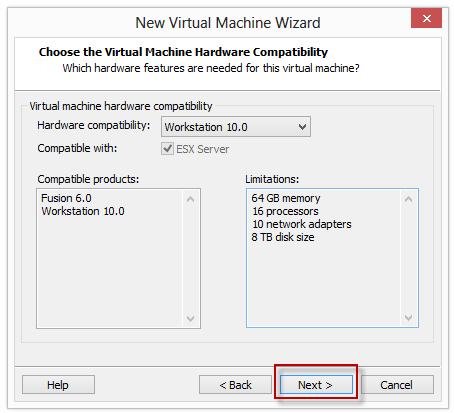
Take the default setting of Workstation 10.0 for your Hardware Compatibility:
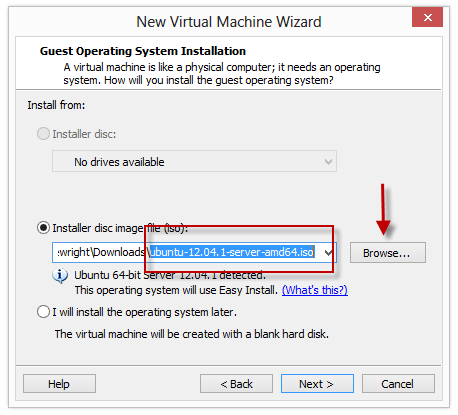
Click the Browse button and locate your Ubuntu Server ISO install file then click Next:
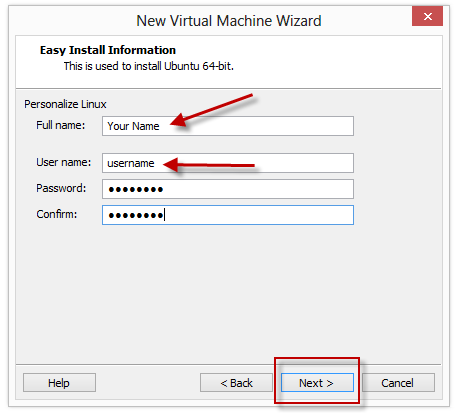
Because we are using the Easy Install wizard, you can type in the username that you will use for your server image. Type in your full name, then your username (which is your login name), and type your password, then click Next:
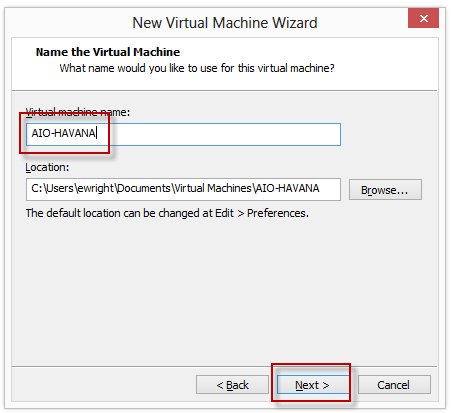
For the machine name, you can choose anything but I recommend that you call it AIO-HAVANA which is what the hostname will be after the install script is run. Then click Next:
For our processor configuration, you will want to add some cores. The smallest build that I’d recommend is a 1 CPU with 2 cores. You can choose more virtual CPU or cores per processor depending on your physical hardware. Pick the appropriate sizing and click Next:
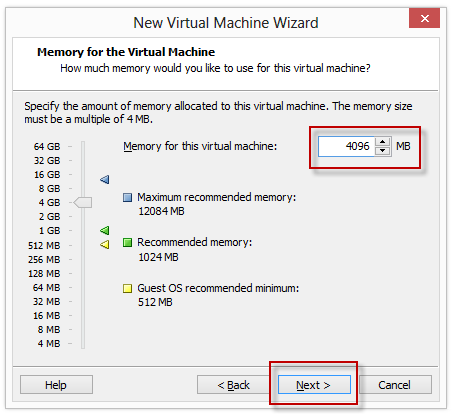
For memory, choose as much as you can spare. The minimum I will recommend is 4 GB, but if you want to do much more guest deployments and testing, more is always better. Pick the amount which suits your lab capabilities and click Next:
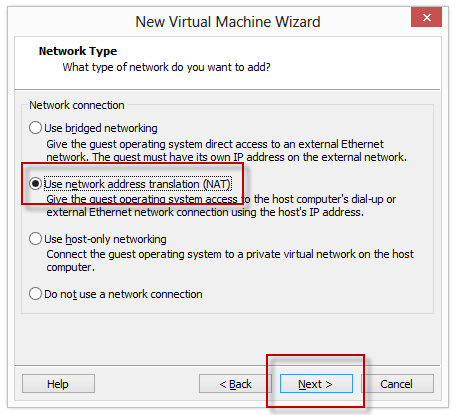
Choose Use network address translation (NAT) for your NIC because this is your public facing interface that we will download the OpenStack packages with. Click Next:
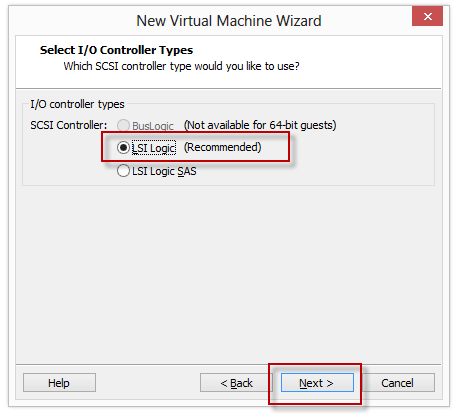
Take the default I/O controller (LSI Logic) and click Next:
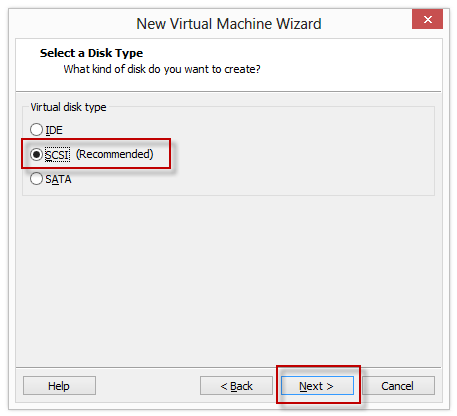
Choose the default (SCSI) and click Next:
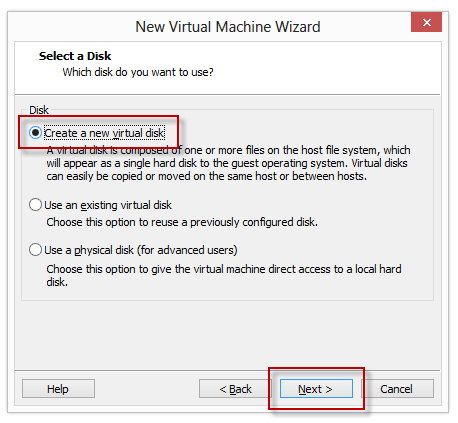
Choose Create a new virtual disk and click Next:
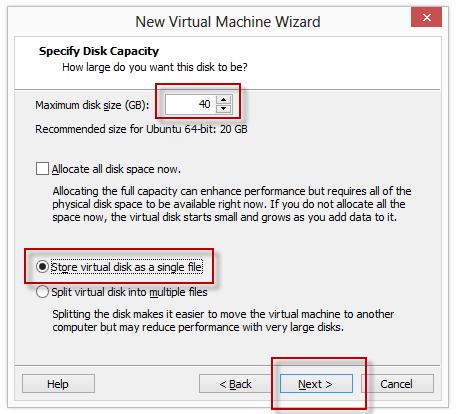
The default is 20 GB, which may work, but I recommend a minum of 40 GB. Remember that this is going to be Thin Provisioned, which means that it will only grow as the data size inside your VM guest grows.
For ease of movement and management, I always like to select Store virtual disk as a single file. Once that has been selected, click Next:
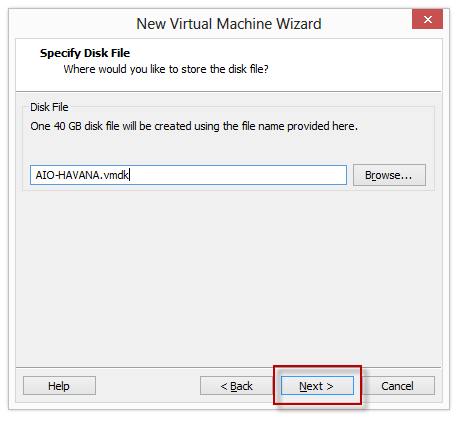
Choose the default name and click Next:
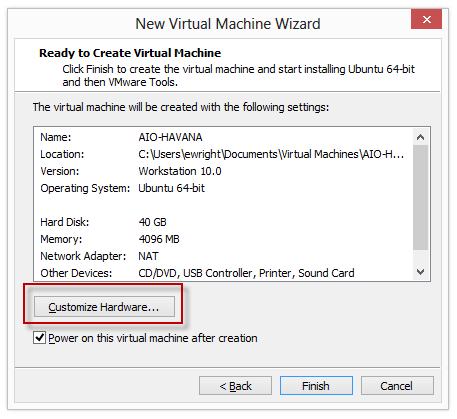
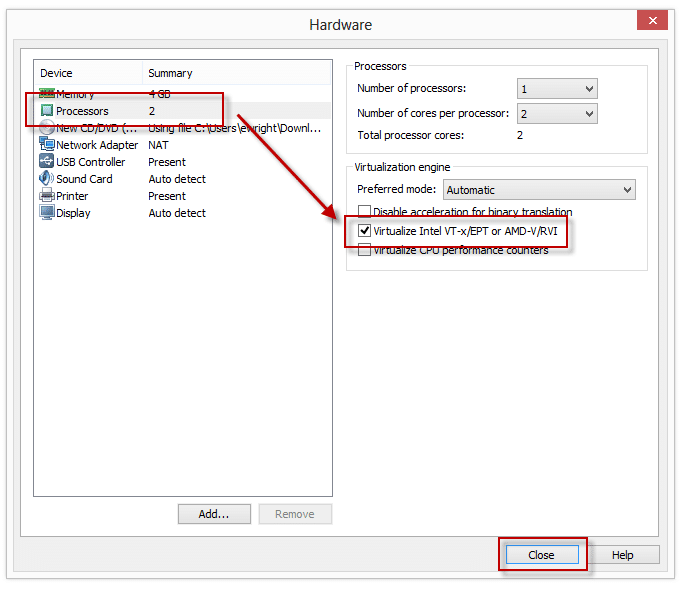
DON’T CLICK FINISH YET!! Before we do that, we have to modify our CPU configuration to set the CPU virtualization option. Click on Customize Hardware:
In the left hand pane, click Processors and then check the Virtualize Intel VT-x/EPT or AMD-V/RVI checkbox and then click Close:
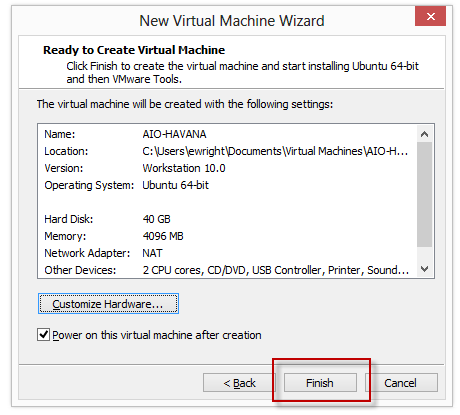
Now we are good to go! Close so click Finish and the VM build will begin:
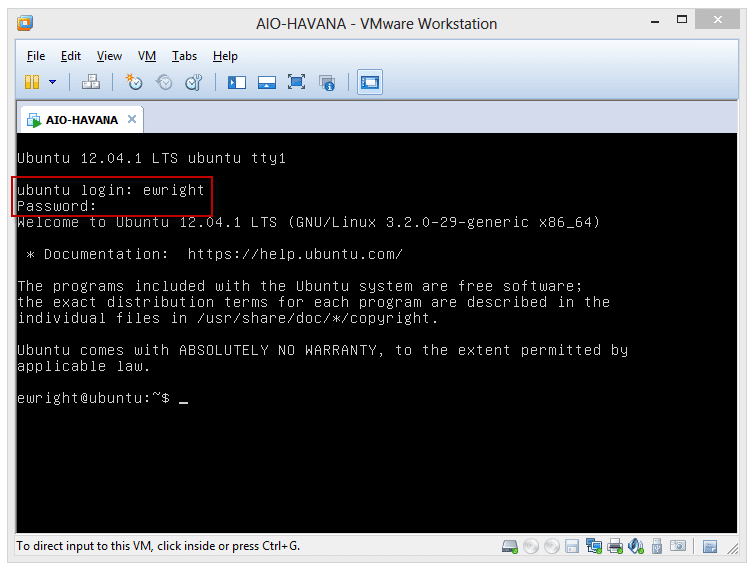
The installation will take anywhere from 5-20 minutes depending on hardware and other factors. Once you are done you will be presented with the login prompt as shown below.
Log in with the username and password that you set during the Easy Install wizard:
Now we are going to do something naughty and type sudo su – which elevates our privileges for the preparation script.
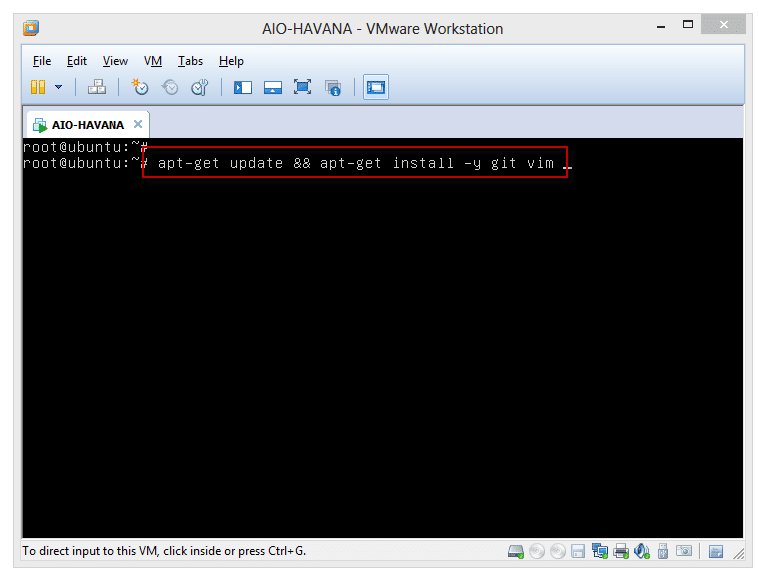
Now we will run the basic package updates and install the git and vim packages. We really only need git, but if you’re feeling like you’d like to dig around, you can edit some files using vim if you feel comfortable with that.
Type the following command:
apt-get update && apt-get install -y git vim
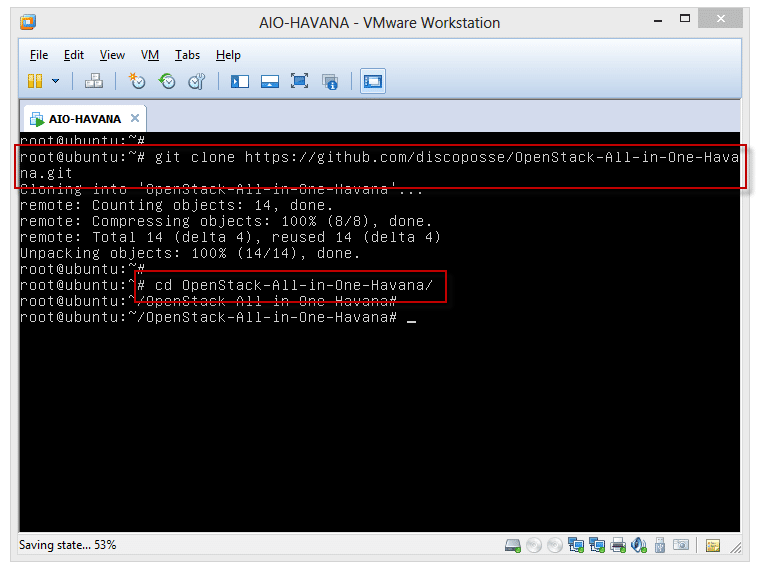
Once that completes, you will be back at the root@ubuntu prompt and you can clone the Git repo which contains the scripts for installing. Type the following command to download the files:
git clone https://github.com/discoposse/OpenStack-All-in-One-Havana.git
Once the files have been cloned, change directory using the following command (Remember that these are case sensitive!):
cd OpenStack-All-in-One-Havana
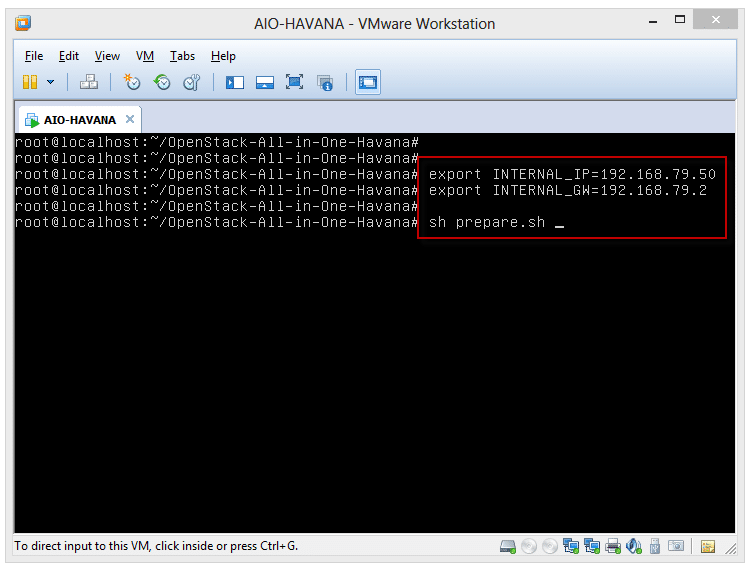
Now we will set some system variables which are used by the preparation and install scripts. The information that you need to know is the IP address that you will use, and the gateway address.
Type the following two commands using your IP info where the xx.xx.xx.xx is listed (see image below):
export INTERNAL_IP=xx.xx.xx.xx
export INTERNAL_GW=xx.xx.xx.xx
Once those variables are set, we will run the preparation script using this command. Note that the preparation script will set the IP network information and then shut down your VM which we need to do for the step following this:
sh prepare.sh
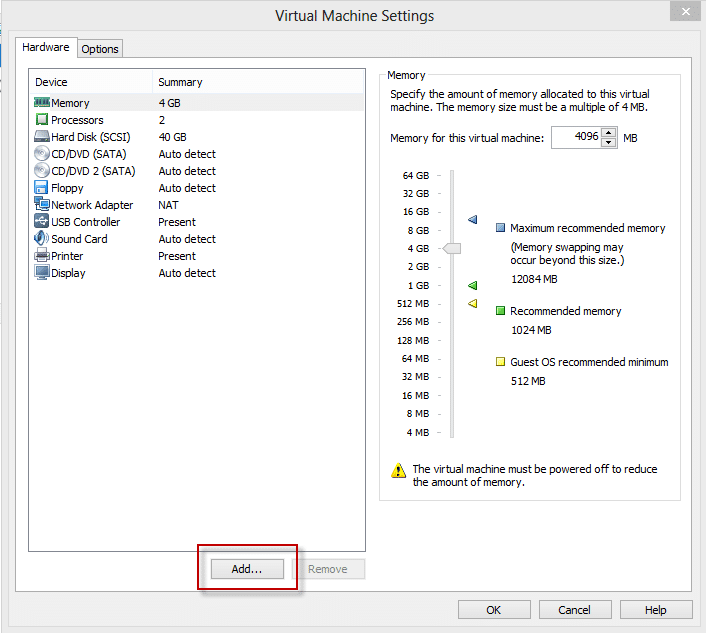
When the preparation script completes the shutdown of your VM, edit the hardware settings and click the Add button:
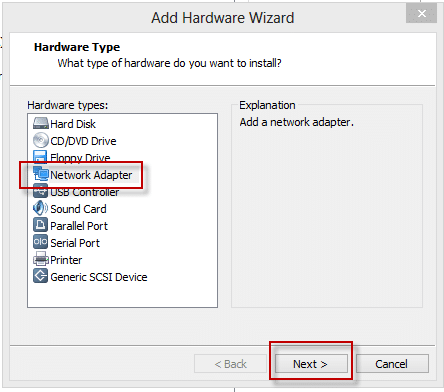
Select Network Adapter as the hardware type and click Next:
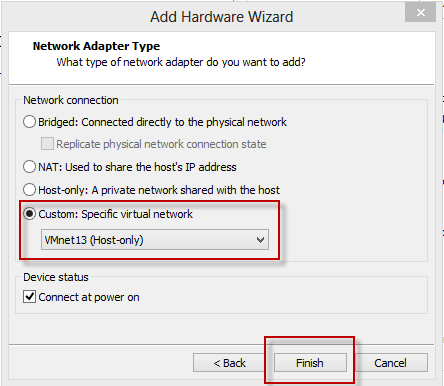
For the Network Adapter Type, choose Custom: Specific virtual network and pick the network from the drop list that is our 10.10.100.0/24 segment and then click Finish:
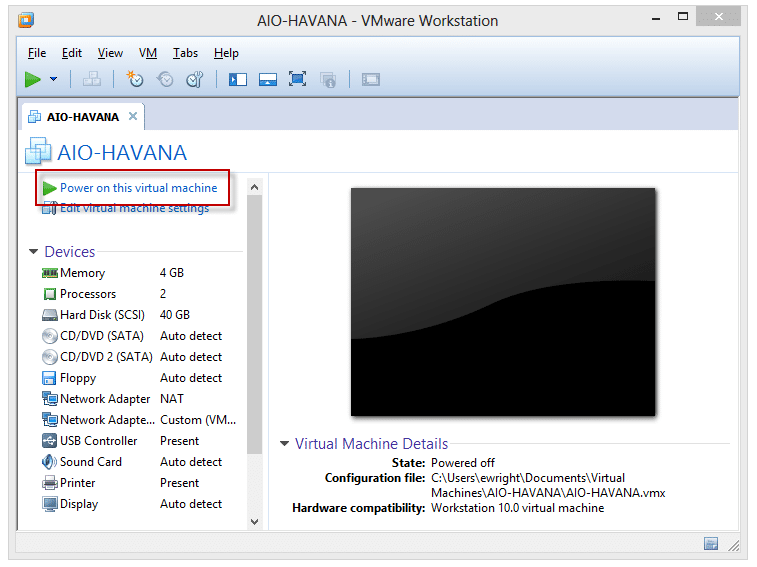
Now that we have added our spare network adapter, power on the VM again:
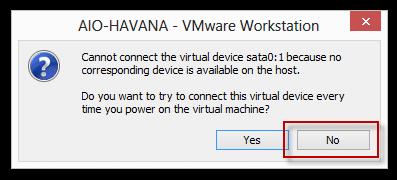
You will be prompted about hardware devices that are not available. This is because we aren’t mounting the CD-ROM ISO file. There will be either one, or two prompts. Click No for each and then the machine will boot up:
Now we will see the login prompt which shows the hostname is aio-havana. Log in with the credentials you used in the first part of the build and we will start the OpenStack install script next.
Half way there!
You’ve done the first, very important steps to prepare your VM environment. Take a breather, and get ready for the next stage of the installation. Now we will log back into our VM and initialized the build script which was downloaded from the Git repository during the preparation steps.
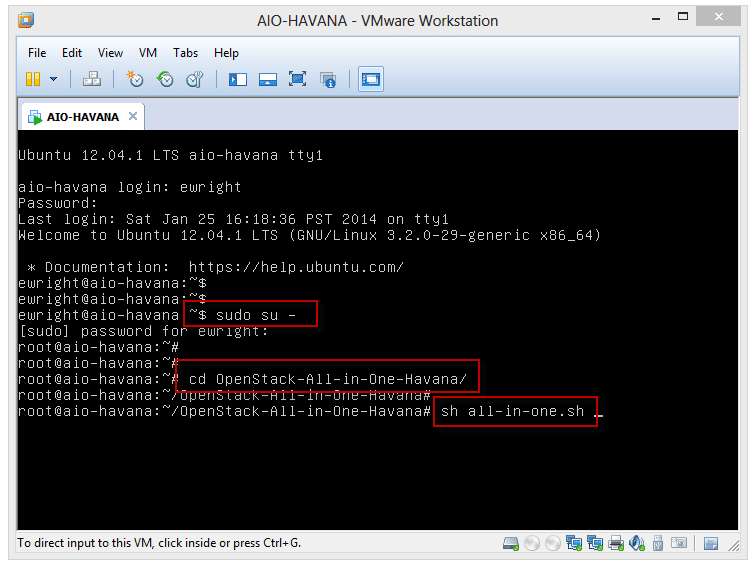
Log on to your VM with your credentials, and we will run the following commands:
sudo su –
cd OpenStack-All-in-One-Havana
sh all-in-one.sh
The install script will start, and lots of exciting OpenStack goodness will be scrolling by for the next 5-15 minutes depending on the speed of your hardware and network hosting your VM.
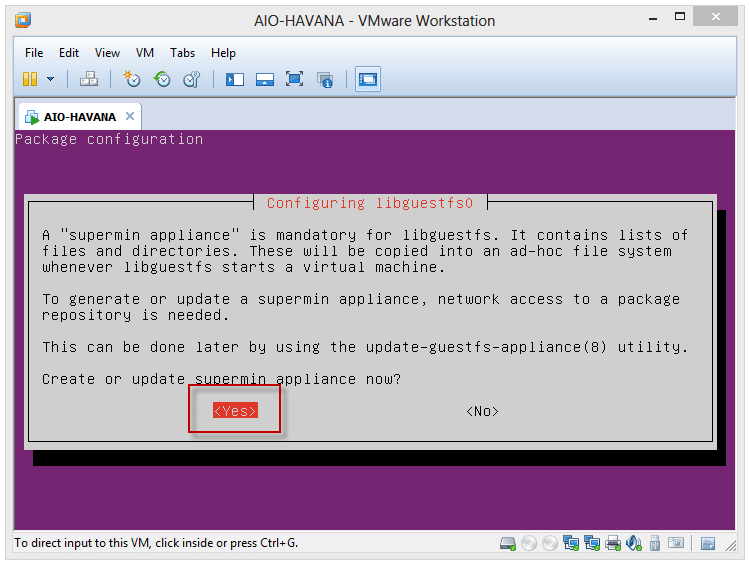
At some point you will see this screen prompting for what is called a “supermin appliance”. Just click into the console, use the arrow key to move the option to Yes and press Enter:
The install script will keep working away for another few minutes and will reboot when it is completed. Once that has happened, you should have a fully deployed OpenStack Havana environment to start your lab work with.
Configuring your OpenStack Havana Install
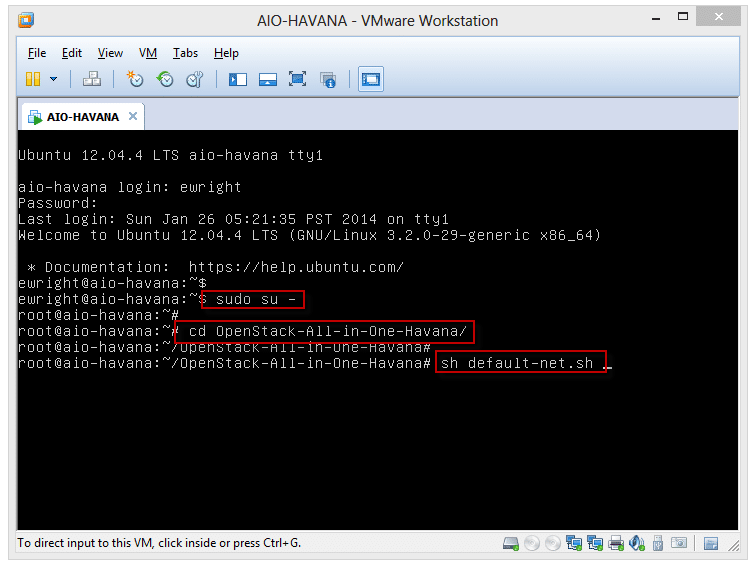
A few more steps are required to configure OpenStack to allow for your first instance to be booted. Log in with your credentials and run the following commands:
sudo su –
cd OpenStack-All-in-One-Havana
sh default-net.sh
That script does the following:
- Create a flat DHCP network for our guest VMs (10.10.100.0/24)
- Add a firewall rule to allow telnet (TCP 22) from all source IP addresses
- Add a firewall rule to allow ping (ICMP) from all source IP addresses
When you run the script, you will see this output:
Once that is done we are ready to do the final pre-launch step which is to create an SSH keypair on our host and load it into Nova.
Creating your SSH Keypair
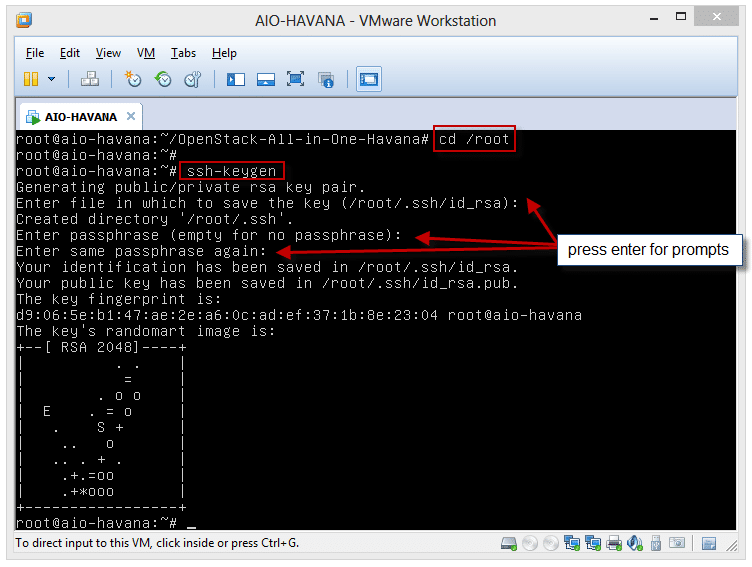
Generating an SSH key is quite simple. We will run the following commands to do that:
cd /root
ssh-keygen
When we are prompted by the SSH keygen for questions, just press Enter to take the defaults for file name and location:
This creates a hidden directory (https://discoposse.com/root/.ssh) where it stores our file that we will now load named id_rsa.pub in the new directory. We will name it mykey just for an easy name to remember.
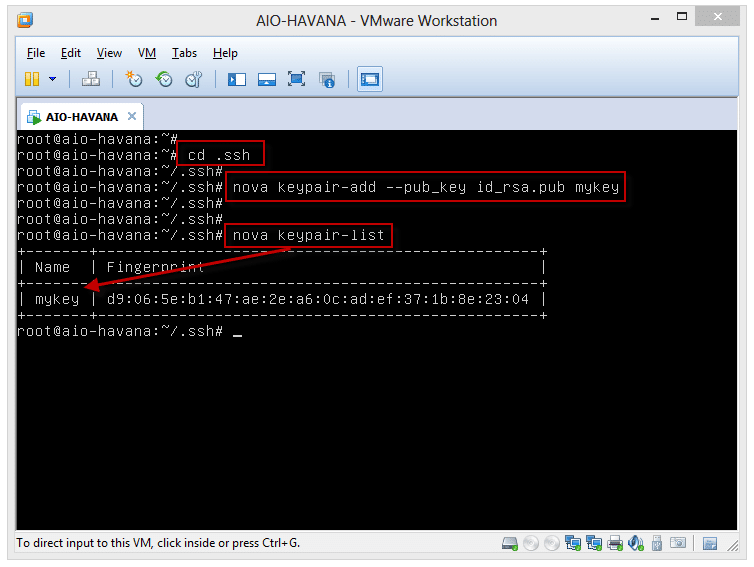
To import this keypair for use in OpenStack, we run the following commands:
cd .ssh
nova keypair-add –pub_key id_rsa.pub mykey
nova keypair-list
The nova keypair-list command confirms that our key has been created and loaded into Nova. We finally have our lab ready for use.
Coming up next in a series of posts are:
- Booting your first Nova instance
- Using the Horizon Dashboard
- Adding OpenStack Block Storage (Cinder)
Stay tuned, and I hope that this will be helpful to get you on your journey to discovering OpenStack!





Thanks a bunch Eric. Have been meaning to check out OpenStack for ages and now there’s no excuse. Keep up the sharing 🙂
Thank you so much for the kind words Mohammed!
Hi Eric,
Thank you for the great tutorial, I cannot see the images for some reason, can you upload again or perhaps send me the tutorial?
Thank you, Marwan! I fixed up the image links. Blog was migrated recently and it looks like a bunch of older posts lost their image links.
Hello
I tried installing openstack in VM Workstation 10 using the commands shown above but when I try the next set of installation after adding the second NIC it shows error saying unabale to fetch.
Please help, urgent
Thank you
Hi Rajkumar,
Can you run these commands and paste the results:
ifconfig
hostname
cat /etc/network/interfaces
Thanks!
Hi Erik,
Couldn’t get this to work. For some reason the 2nd network adapter is not being recognized by Ubuntu, so that when I get to the default-net.sh script, it returns a bunch of 500 errors. Not sure how to get around this. I used the exact same settings, item for item and network for network, as you did in this article.
Here’s my network information as reported by Ubuntu:
IFCONFIG
eth0 Link encap:Ethernet HWaddr 00:0c:29:c2:4a:d9
inet addr:192.168.79.50 Bcast:192.168.79.255 Mask:255.255.255.0
inet6 addr: fe80::20c:29ff:fec2:4ad9/64 Scope:Link
UP BROADCAST RUNNING MULTICAST MTU:1500 Metric:1
RX packets:187 errors:0 dropped:0 overruns:0 frame:0
TX packets:226 errors:0 dropped:0 overruns:0 carrier:0
collisions:0 txqueuelen:1000
RX bytes:42852 (42.8 KB) TX bytes:23492 (23.4 KB)
lo Link encap:Local Loopback
inet addr:127.0.0.1 Mask:255.0.0.0
inet6 addr: ::1/128 Scope:Host
UP LOOPBACK RUNNING MTU:65536 Metric:1
RX packets:287 errors:0 dropped:0 overruns:0 frame:0
TX packets:287 errors:0 dropped:0 overruns:0 carrier:0
collisions:0 txqueuelen:0
RX bytes:23773 (23.7 KB) TX bytes:23773 (23.7 KB)
virbr0 Link encap:Ethernet HWaddr 36:73:56:71:57:39
inet addr:192.168.122.1 Bcast:192.168.122.255 Mask:255.255.255.0
UP BROADCAST MULTICAST MTU:1500 Metric:1
RX packets:0 errors:0 dropped:0 overruns:0 frame:0
TX packets:0 errors:0 dropped:0 overruns:0 carrier:0
collisions:0 txqueuelen:0
RX bytes:0 (0.0 B) TX bytes:0 (0.0 B)
HOSTNAME
jrutt@aio-havana:~$ hostname
aio-havana
CAT INTERFACES
# localhost
auto lo
iface lo inet loopback
# public IP
auto eth0
iface eth0 inet static
address 192.168.79.50
netmask 255.255.255.0
gateway 192.168.79.2
dns-nameservers 8.8.8.8
auto eth1
iface eth1 inet manual
up ifconfig 0.0.0.0 up
up ifconfig promisc
Hi Erik, this isn’t working for me…It seems the 2nd network adapter is not being mounted by Ubuntu even though I’ve followed your instructions step by step and used the same exact network settings…Could I be missing something here?
Hi Jim,
Sorry for the late reply. Based on the 500 errors during the initial running of the default-net.sh script, there seems to have been an error somewhere else in the process.
If you’re comfortable in the shell, you can go to the /var/log/keystone folder to view the keystone.log file for potential errors. Another spot is the /var/log/nova/ which has many important logs. The nova-network.log should lead us to some of the root cause of the 500 errors.
Also, try running these commands when in a sudo – session:
source ~/openrc
keystone user-list
keystone endpoint-list
Thanks for the feedback. Let’s see if we can get you back up and running! 🙂
Eric, trying to do the cloning git but your server github.com was asking for authentication. do you provide a username/pw?
Hi Noli,
That’s odd for sure. I don’t have any auth requirements for the git clone. I’ve tried from another machine and didn’t get prompted. Maybe you can do me a favor and screen shot or send a little bit of detail Feel free to email me to eric -at- discoposse -dot- com.
Thanks and I hope to get you up and running soon!
For those developer just need a All-in-one OpenStack VM, all in a box, why not share your VM disk image?
Hi Sunding,
There are a few options for doing that, but the real driver for the post series is to get some administrators and developers up and running while still being partially interactive. You bring up a great point for sure. I usually recommend developers to use DevStack or the Rackspace Private Cloud for a more packaged deployment. Those are both great ways to just get to the point of using the environment without any real heavy lifting at all.
Thanks for the feedback 🙂
Hi Eric, Thanks a lot for the clear instructions. I managed to install the OpenStack in half an hour. It’s really amazing.
I have one question.
While creating the VM, we checked”Virtualize Intel VT-x/EPT or AMD-V/RVI”. In such case, what hypervisor are we using. As we have installed Ubuntu I assume we are running OpenStack over KVM hypervisor but at the same time VM Work station is running a hypervisor to install Ubuntu as well. So how is this architecture look like? Is there any command line to see this hierarchy ?
Many thanks !
Cheers!
Vishal
2.
Hi Vishal,
Thank you so much for the great feedback! The Intel VT-x/AMD-V check box is used just to present the hardware virtualization capability of your host CPU to the virtual guest environment. Our lab is running KVM as the hypervisor as I’ve had the most experience using it. We may change up things down the road and do a Xen version also.
Thanks!
thank you for this clear tutorial
can i use these instructions on a i386 ubuntu virtual machine ?
thanks 🙂
Hi Marwen,
Thank you for the kind feedback! That’s a great question, and I can’t confirm yet. I haven’t run the process on a 32-bit machine before. I will give it a run and see. There are many components that should dynamically adapt as they are downloaded, but it will take some testing.
Generally, all of the hardware that we are working with will be 64-bit which was the biggest driver to choose that image. I’ll let you know how the testing goes!
Thanks…Eric
hi Eric,
thanks you for your answer .
i’have finally got a 64 amd machine..i followed this tutorial but i’ve got an error while confguring the opnestack havana installation ..in fact after running “sh default-net.sh” i’ve got this issue :
usage: nova [–debug] [–os_username OS_USERNAME] [–os_password OS_PASSWORD]
[–os_tenant_name OS_TENANT_NAME] [–os_auth_url OS_AUTH_URL]
[–os_region_name OS_REGION_NAME] [–service_type SERVICE_TYPE]
[–service_name SERVICE_NAME] [–endpoint_type ENDPOINT_TYPE]
[–version VERSION] [–username USERNAME]
[–region_name REGION_NAME] [–apikey APIKEY]
[–projectid PROJECTID] [–url URL]
…
error: argument : invalid choice: ‘network-create’
Try `nova’ for more information.
ERROR: n/a (HTTP 400)
ERROR: n/a (HTTP 400)
what shall i do ?
thanks a lot
Marwen
Great instructions, but it is failing at the default-net.sh script
some sort of issue with eth1
auto eth1
iface eth1 inet manual
up ifconfig 0.0.0.0 up
up ifconfig promisc
Any assistance would be appreciated.
Hi Eric,
Would you be able to show the output from the script when the default-net.sh script is run? Another thing to try before running it is to type this:
source /root/openrc
Sometimes it seems that the environment settings aren’t being loaded which will cause some errors accessing the Keystone environment.
Thanks…Eric
Hi Eric,
Thanks for this post, am currently on a research that will need me setting up a cloud testbed so i decided to use openstack. After the first set of installation, i had issues with the “apt-get update && apt-get install -y git vim-” command as my VM keeps failing to fetch https://us.archive.ubuntu.com/ubuntu/dists/precise-security/Release.gpg and returned with a message “E: Unable to locate package git” ” E: Package ‘vim’ has no installation candidate”. I guess the proxy server in my University is the cause. If so can you please advice me how to get around this.
In this case we are in a bit of a bind. Without direct access to the repository on the internet we won’t be able to run any of the installers as they all fetch from public servers. I wish I had a better work around for this one. If you do have a proxy and port number that we can use to connect to the internet, we can try to send the traffic out over that path.
Let me know if you have that information and I can point you to some configuration steps to try that out.
Thanks!
Thanks for this post, am currently on a research that will need me setting up a cloud testbed so i decided to use openstack. After the first set of installation, i had issues with the “apt-get update && apt-get install -y git vim-” command as my VM keeps failing to fetch https://us.archive.ubuntu.com/ubuntu/dists/precise-security/Release.gpg and returned with a message “E: Unable to locate package git” ” E: Package ‘vim’ has no installation candidate”. I guess the proxy server in my University is the cause. If so can you please advice me how to get around this.
Thanks for great post – just a follow up, it seems to me that the INTERNAL_IP and INTERNAL_GW dont seem to transfer after the script is done. When I reboot my machine it seems that my NIC is gone, and I can’t reach any network since there is no addresses or NICs (except the Loopback interface). Is it possible to continue with just sh prepare.sh without exporting the IP & GW?
Thank you for the kind feedback 🙂
For the preparation script to run and for the install to work it will definitely need those environment settings in place. Those feed into the shell scripts in a number of places to define the endpoint addresses and routing for the default networks.
Hi Eric, i messaged you sometimes last week complaining about the proxy server in my university blocking me from installing openstack. Am in a different environment now and the error message still persist during the “configure the package manager ” stage stating “Bad archive mirror” with a red screen. It also stated possible reason for the error like incorrect mirror specified;mirror not available due to unreliable network; mirror is broken or mirror does not support the correct Ubuntu version. Whats your advice here?
Eric,
I followed the instruction to install openstack in Ubuntu Server 14.04 LTS but got below error when running “sh default-network.sh”
ERROR: Unauthorized (HTTP 401)
ERROR: Unauthorized (HTTP 401)
ERROR: Unauthorized (HTTP 401)
do you have any suggestion?
Hi Johnny,
I’ll have to run this on a 14.04 system to see what the results are. Admittedly, I have only done tests on 12.04 but I will do an Icehouse version on 14.04.
Once I have my 14.04 test done I can hopefully push any patches to get Havana working on that platform too.
Thanks!
Hi Eric,
Do u think this can build in a Docker container? a ubuntu 12.04 container for example.
Great point! I’ve been doing some Docker testing and I will be posting some quick articles soon. I’ll be at the Cloud Expo which should help to inspire me to get these posts built and up for everyone 🙂
where and how do I get the values for the IP and gateway?
Type the following two commands using your IP info where the xx.xx.xx.xx is listed (see image below):
export INTERNAL_IP=xx.xx.xx.xx
export INTERNAL_GW=xx.xx.xx.xx
Hi Don,
The IP info will be based on your VMware Workstation configuration. You will see it under Edit | Virtual Network Editor. If you need more detail to find it, let me know!
Thanks,
Eric
Do you have similar setup for RHEL? Does these post OS scripts work on RHEL 6.5 as well?
Hi Raj,
This one won’t work for RHEL as it’s Ubuntu specific. I’ll be building one for Ubuntu and CentOS soon hopefully. RHEL is more challenging because it requires the licensing but I hope to tackle it also.
Thanks!
Great tutorial and instructions are very clear. But what should be the minimum hardware requirements to deploy openstack to run a small instance?
thank you
Hi Sujay,
You’ll want at least 8 GB of RAM, but more is always better. Any CPU will work, but again, the more you have to give it, the better the user experience will be.
Thanks!
Hi Eric,
Excellently written article. I however am in the same boat as Rajkumar. The default net script returns a 500 error.
root@aio-havana:~/OpenStack-All-in-One-Havana# sh default-net.sh
ERROR: The server has either erred or is incapable of performing the requested operation. (HTTP 500) (Request-ID: req-b76766e3-92f3-427a-8ad0-ad9659c8626e)
My network details:
cat /etc/network/interfaces
# localhost
auto lo
iface lo inet loopback
# public IP
auto eth0
iface eth0 inet static
address 192.168.184.143
netmask 255.255.255.0
gateway 192.168.184.2
dns-nameservers 8.8.8.8
auto eth1
iface eth1 inet manual
up ifconfig 0.0.0.0 up
up ifconfig promisc
—————-
hostname
aio-havana
——————–
root@aio-havana:~/OpenStack-All-in-One-Havana# ifconfig
eth0 Link encap:Ethernet HWaddr 00:0c:29:5b:54:13
inet addr:192.168.184.143 Bcast:192.168.184.255 Mask:255.255.255.0
inet6 addr: fe80::20c:29ff:fe5b:5413/64 Scope:Link
UP BROADCAST RUNNING MULTICAST MTU:1500 Metric:1
RX packets:3972 errors:0 dropped:0 overruns:0 frame:0
TX packets:3038 errors:0 dropped:0 overruns:0 carrier:0
collisions:0 txqueuelen:1000
RX bytes:3394633 (3.3 MB) TX bytes:346275 (346.2 KB)
eth1 Link encap:Ethernet HWaddr 00:0c:29:5b:54:1d
inet6 addr: fe80::20c:29ff:fe5b:541d/64 Scope:Link
UP BROADCAST RUNNING MULTICAST MTU:1500 Metric:1
RX packets:47 errors:0 dropped:0 overruns:0 frame:0
TX packets:26 errors:0 dropped:0 overruns:0 carrier:0
collisions:0 txqueuelen:1000
RX bytes:4641 (4.6 KB) TX bytes:3972 (3.9 KB)
lo Link encap:Local Loopback
inet addr:127.0.0.1 Mask:255.0.0.0
inet6 addr: ::1/128 Scope:Host
UP LOOPBACK RUNNING MTU:16436 Metric:1
RX packets:1112 errors:0 dropped:0 overruns:0 frame:0
TX packets:1112 errors:0 dropped:0 overruns:0 carrier:0
collisions:0 txqueuelen:0
RX bytes:260720 (260.7 KB) TX bytes:260720 (260.7 KB)
virbr0 Link encap:Ethernet HWaddr ba:71:29:3d:7a:60
inet addr:192.168.122.1 Bcast:192.168.122.255 Mask:255.255.255.0
UP BROADCAST MULTICAST MTU:1500 Metric:1
RX packets:0 errors:0 dropped:0 overruns:0 frame:0
TX packets:0 errors:0 dropped:0 overruns:0 carrier:0
collisions:0 txqueuelen:0
RX bytes:0 (0.0 B) TX bytes:0 (0.0 B)
—————————
keystone.log no erros
—————————-
nova-network.log (ERRORS)
2016-05-17 11:47:38.535 84090 ERROR nova.servicegroup.drivers.db [req-cf64c156-51ff-4ffe-919c-b682ce7b4441 None None] model server went away
2016-05-17 11:52:39.354 2223 ERROR nova.openstack.common.threadgroup [-] (OperationalError) attempt to write a readonly database u’INSERT INTO services (created_at, updated_at, deleted_at, deleted, host, binary, topic, report_count, disabled, disabled_reason) VALUES (?, ?, ?, ?, ?, ?, ?, ?, ?, ?)’ (‘2016-05-17 18:52:39.330213’, None, None, 0, ‘aio-havana’, ‘nova-network’, ‘network’, 0, 0, None)
Please let me know what can be the issue.
Thanks
I’ve got to chase down the version of the repositories we have. Because this is an extremely old version, some of the packages may not be working the same anymore 🙁
If you are able to, I would also suggest running the more full lab that I have worked on building with the OpenStack Cookbook team here: https://discoposse.com/2015/11/21/installing-the-openstack-cookbook-on-osx/ as it is tested and updated regularly
Hi Eric,
thanks for your great work. Do you have any answer to Johnny Chen 401 problem? I`ve got the same with ubuntu 14.04. TLS.
Tanks
I’m about to launch an updated version to get us past this. We have so many updates that win out over the Havana build, so I’ll have that posted within a couple of weeks once I’ve finished some testing. Thanks for the feedback and reminder! 🙂