Managing data inside a CSV file is surprisingly simple thanks to the PowerShell Import-CSV CmdLet. I’m often presented with data from different sources in a variety of formats, and by and large the common format used for data extracts is CSV. Regardless of the system that generates the content, we can all render and consume data using this simple and effective format.
You will find the Microsoft TechNet documentation here: http://technet.microsoft.com/en-us/library/dd347665.aspx
PowerShell Import-CSV into Variable
When it comes to using PowerShell Import-CSV the best way to illustrated it is to use an example. In this example, we will use PowerShell Import-CSV to assign our data to a variable of the array type.
The file that we will use as our example is one that contains a username, email address, street address, postal code (zip code for my US friends) and a phone number. This is what the file would look like for our sample which will be named UserList.CSV:
username,full name,email,address,postalcode,phone
ewright,Eric Wright,eric@somedomain.com,123 Any Street,L4C 1N8,555-1212
jvoigt,Jens Voigt,jens@somedomain.com,456 Any Street,L4C 1N8,555-3456
ppocklington,Peter Pocklington,peter@anotherdomain.com,890 Back Street,M2H 4Y1,555-9876
Note that there is a header row which is one of the most important aspects for our script. If the file that you want to use does not have a header row, we can add one. I’ll go into that more deeply in an upcoming article.
What we do first is to bring the file using PowerShell Import-CSV into a variable as an array. This is done by creating a variable which we will call $userobjects and assigning it a value using the Import-CSV CmdLet. Let’s assume that you have the import file in a folder X:ImportData
$userobjects = Import-CSV x:ImportDataUserList.CSV
No really, it’s just that simple. Now you have an array variable which you can use to access the data in a number of ways. Let’s look at a couple of methods to pick out data:
Accessing Data After Importing CSV into an Array Varriable
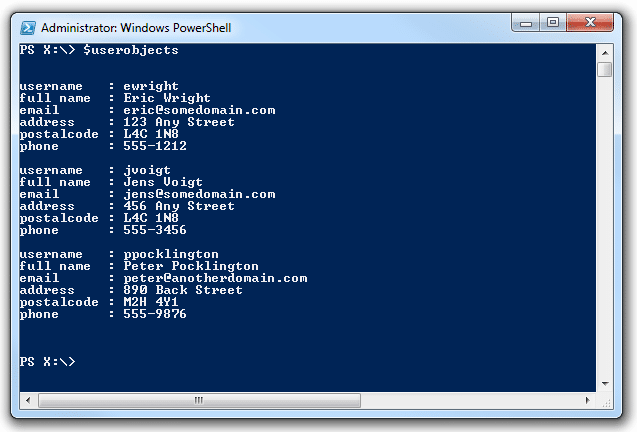
Display all instances in the array:
$userobjects
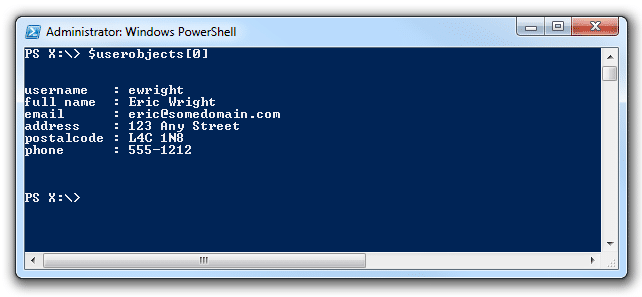
Display the first element in the array:
$userobjects[0]
Ok, hold on a second. Why did we use 0 (zero) to pull the first record? This is a done because when an array is populated, the first element is in position 0. For a 2 dimensional array, the first element is 0,0 rather than 1,1 which can be a source of confusion.
The purpose of the article was to talk about headers so now you will see where that comes into play. We have drawn out the different elements inside the array, so now we can use the headers to be able to gather the content of each element in a meaningful way. Let’s say that we want to see the email address of the first element.
$userobjects[0].email
It’s so dangerously simple really. Because the array was imported with the Import-CSV, the header row was assigned to columns just as we would see it inside a spreadsheet program. Just think of it as element[instance].property which means you can select any assigned property (column header) from any instance of the element.
We can also do things such as count the elements which can be a handy piece of information to have:
$userobjects.count
In part 2 we will expand our script to loop through the elements and show you different ways that we can manage our data from the CSV file and begin to perform other operations using the contents.
This post is part of a series on using the PowerShell Import-CSV Command.
Part 1 – Importing a CSV Into PowerShell with Import-CSV
Part 2 – Looping when Importing a CSV Into PowerShell with Import-CSV foreach
Part 3 – Importing a CSV Into PowerShell with Import-CSV and Adding Headers


Hey Eric!
Thank you for your great tutorial.
I worked through it a bit and found it very useful, but still I reached a point I can’t pass by yet.
I have a text file in which I include a header and the raw services names, nothing else. These names were added manually, one service name per column.
Example:
Dienste (← that’s the header, Dienste means ‘services’ in german)
AdobeARMservice
AdobeFlashPlayerUpdateSvc
Adobe LM Service
VMAuthdService
VMnetDHCP
VMware NAT Service
What I want to do is to build a PowerShell GUI to manually point to this file, then give out the services in a Grid-view and mark the services either green or red – depending on the status, with the possibility to shut all of them down.
So when I open the form, I select the file, then click a button “Start” and then want to have this list walked through and get the info whether the services is running or not. And beyond I want to add another button to end all of those services.
The problem:
Whenever I try this, things are getting messy.
$ArrayDienste = Import-Csv "C:Path-to-filesDienste.txt"

foreach ($Dienstobjekt in $ArrayDienste) { Get-Service $Dienstobjekt.Dienste | Format-Table -Property name,status }
What I see (you can try that easily with the above statement) I get a list that is badly formatted and always includes the underlined words “Name” and “Status”, but I only want a list that’s formatted so I can pass this over to the Grid-view – but I fail to do so.
Do you have any idea what I could do in order to overcome this?
Thank you very much in advance!
Tobias
Hi Tobias,
We will need a little info on what your desired output is to really work the data, but the first things we can do is deal with the headers.
For the Format-Table, you can also add the -HideTableHeaders parameter which would remove the repetitive titles of name and status from coming up. This would be the modified command for that:
foreach ($Dienstobjekt in $ArrayDienste) { Get-Service $Dienstobjekt.Dienste | Format-Table -Property name,status -HideTableHeaders }The problem there is that we have actually only hidden the header. If you want the output to go to GridView, what you actually have here is a GridView output for each Get-Service if you replaced the Format-Table with Out-GridView.
So the solution I think you may be after, is to take the output from your Get-Service request and feed it into an output array, then you can take that array and output that to the Out-Gridview. What we will do here is to create a hash table, loop through the service to get the name and status, add to the hash table, and then we will output the hash table to the Out-GridView:
$ArrayDienste = Import-CSV dienste.txt$OutArray = @{}
foreach ($Dienstobjekt in $ArrayDienste) {
$Dienste = $Dienstobjekt.Dienste
$Results = (Get-Service | Where-Object {$_.name -eq $Dienste} | Select-Object name,status)
Write-Host $Results
$OutArray.Add($Results.name,$Results.status)
}
$OutArray | Out-GridView
Now you will have one scan of the services, and the output will pop up with all values in a single table in GridView format.
Hope that does what you need it to.
Eric
Hey Eric!
First of all: Wow, wonderful – thanks a lot! That was both quick and helpful, even if I feel badly reminded to work through my PowerShell perusal again (and again and again) 😉
I tend to write too much of stuff that’s not important and too little of what I actually want to do.
Factually I’m working myself through the SAPIEN PowerShell Studio 2012 to create Winforms kind of executables. This even does not have a practical use as what I want to do can be achieved using regular WMI-Scripting over PowerShell and even over batch, but this is what I would call a ‘feasibility study’.
So here’s how it should work:
I open up a program, enter a path to where a text (or CSV) file is located. This file only contains the services I want listed in my program later on.
Each service should be listed in a separate line within the SAPIEN PowerShell Studio $datagrid control element. A green icon should light up behind where the service is still running and a red light where it’s stopped.
Here’s how the window looks like:
See the program and how it’s built up!
As the DataGrid is a table structure, I want every line in that Grid to include a single name from that text file and in the second column indicating the service status. Also I want to add a button to end all of these (declared by me) unnecessary services.
Your example works perfectly, but I can’t stop services there. Also working with Arrays in PHP felt much easier 😉 I’m really trying but only sleeping over it makes me solve problems. This will take a lot of sleep I guess … I hope I made myself clear now what I want to achieve and how I want this to be done. I guess I’m a little closer now with your suggested solution but I’ll only to try to implement it tomorrow (too hot today and too much other stuff to be done unfortunately).
Anyhow: Thanks a lot and hope to hearing from you soon!
Tobias
What a great and easy to understand tutorial.
Well done Eric. Thank you for sharing
Thank you so much for the kind words!
Thanks, this helped me get a couple things straightened out– nice tutorial.
Glad to hear 🙂